SunPrint
Education Lab

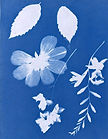


What Is SunPrint?
What You Need
Sunprint is a photographic printing process that uses light-sensitive chemicals and sunlight to create blue-and-white images. Objects placed on the treated paper block the light, leaving lighter shapes behind, while the exposed areas gradually develop into deep blue.
-
Pre-treated SunPrint paper
-
Leaves, flowers, or other flat objects
-
A clear acrylic sheet or transparent frame
-
Clips
-
Direct sunlight
-
Clean water
-
A tray or container for rinsing
-
Gloves
STEPS
1. Choose Your Objects
Select leaves, flowers, grasses, or other flat materials. Objects with interesting edges, holes, or different levels of transparency often create more detailed results.
3. Secure the Materials
Place a transparent sheet over the composition and secure it with clips so the objects do not move during exposure.
5. Rinse
Remove the objects and rinse the paper thoroughly in clean water for one minute. The image will begin to appear as the exposed areas deepen into blue.
2. Arrange the Composition
Place the objects on the SunPrint paper while keeping the paper away from strong sunlight. Move the objects around until you are satisfied with the composition.
4. Exposed to Sunlight
Bring the paper into direct sunlight. Exposure time varies depending on the weather and the type of paper, but usually takes 5-15 minutes.
6. Dry and Develop
Place the print flat or hang it to dry. The blue color will continue to deepen as the SunPrint oxidizes.